


Usually we would start developing a website in a local server. Then, we upload it to a staging site, and after everything are confirmed, we push the website to the live server. As simple as that sound, developing a website can be a very lengthy process.
In this post, we will see how to deploy and configure these stages effectively when developing for WordPress using a handy plugin called WP Local Toolbox.
Once the plugin is activated, it exposes a number of PHP constants. To name but a few, these constants will let us know if we are currently in a live site or in local site, ensure unnecessary plugins in certain stage remain deactivated, and notify us when new content has been added in the live site.
Development Stage
This is where we start. We build our website in a localhost: a web server running in our computer. If you are using OS X, you can easily set one up with MAMP. Windows users have a few more options such as MAMP (for Windows), WAMP, and XAMPP.
At this stage, you can use development tools like Codekit, and Grunt or Gulp. You can work together with your colleagues using Git version control; you can also freely conduct some experiments, and safely make errors along the way.
In the development period, I encourage you to enable the WP_DEBUG and to install a few WordPress plugins such as Query Monitor, RTL Tester, and User Switching in addition to the plugins that we would deploy in the live site. These few extra plugins are meant to facilitate the development as well as testing process. That said, we will not activate these plugins at the staging or live site.
Open the wp-config.php, and add the following line after define('WP_DEBUG', true);.
define('WP_DEBUG', true); define('WPLT_SERVER', 'dev');
This line marks our WordPress install in localhost as “development”. When you log in to the WordPress dashboard, you will notice that the Admin bar, by default, now returns green with the server stated as DEV SERVER.
Setting it dev enables the “Discourage search engines from indexing this site” option to prevent the site accidentally being indexed in Search Engine, although it is only accessible in our computer.

If you do not like the default green, you can always change it by defining WPLT_COLOR. The color can be defined with a color keyword or with the Hex format as shown below.
define('WPLT_COLOR', '#7ab800');
Additionally, you might also want to forcefully deactivate a few plugins that are not needed during development, like the caching plugin, backup plugin and Akismet.
To do so, specify each plugin in an array with WPLT_DISABLED_PLUGINS.
define('WPLT_DISABLED_PLUGINS', serialize( array( 'w3-total-cache/w3-total-cache.php', 'akismet/akismet.php', ) ));
“Staging” Stage
The “staging” site is where we test our site. Ideally it should be in an environment that is closely mimics (the content, the server specification, and etc.) the live site in order to catch bugs and errors that we may have missed in the development stage.
The site usually should only be accessible to some people including the clients, to show them the final version of the websites.
Some plugins are better deactivated such as the plugins that we have used in the development stage, a caching plugin, and a backup plugin. Staging site could be set in a subdomain, for example, staging.coolsite.com or in a separate domain like coolsitestaging.com.
We define the staging site in wp-config.php as follows.
define('WP_DEBUG', true); define('WPLT_SERVER', 'testing'); define('WPLT_DISABLED_PLUGINS', serialize( array( 'w3-total-cache/w3-total-cache.php', 'akismet/akismet.php', 'debug-bar/debug-bar.php', 'debug-bar-extender/debug-bar-extender.php', 'debug-bar-console/debug-bar-console.php', 'simply-show-ids/simply-show-ids.php', 'monster-widget/monster-widget.php', 'theme-check/theme-check.php', 'wordpress-beta-tester/wp-beta-tester.php', ) ));
We now set the server as staging or testing. The Admin bar color should now turn orange.
At this stage, we can also deactivate a few plugins that we use for development. We keep a few other development plugins activated and WP_DEBUG enabled as we need to catch errors while testing in the staging server.
Live Stage
This is the final stage where we publish our site in a live server and let everyone and anyone see the website. In this stage, we should also deactivate all the plugins for developments and finally activate caching and backup plugins among other things.
define('WP_DEBUG', false); define('WPLT_SERVER', 'live'); define('WPLT_DISABLED_PLUGINS', serialize( array( 'developer/developer.php', 'debug-bar/debug-bar.php', 'debug-bar-extender/debug-bar-extender.php', 'debug-bar-console/debug-bar-console.php', 'simply-show-ids/simply-show-ids.php', 'regenerate-thumbnails/regenerate-thumbnails.php', 'rewrite-rules-inspector/rewrite-rules-inspector.php', 'rtl-tester/rtl-tester.php', 'user-switching/user-switching.php', 'monster-widget/monster-widget.php', 'theme-check/theme-check.php', 'query-monitor/query-monitor.php', 'wordpress-beta-tester/wp-beta-tester.php', ) ));
The live stage Admin bar defaults to red (this can be changed). Keep an eye for new content in the live server to keep the testing server database updated with the new content as in the live server; it will make testing more accurate, and ensure that the new contents are displayed OK.
Add the following line in the live server wp-config.php to do so.
define('WPLT_NOTIFY','me@outlook.com');
Once set, we will receive notification through email when our client add new content (posts and pages) in the live server. When they do, copy the content database from live.
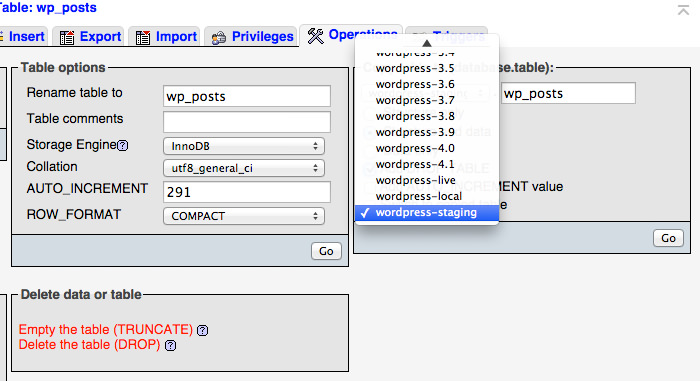
If your testing and live server are hosted in the same server, go to phpMyAdmin. Then, select the wp_posts database and select the Operations tab. Within the Copy table to (database.table) box, select the staging site database and make sure that the Add DROP TABLE option is checked so that it will overwrite the existing database.
That’s it, we now have nicely organized stages for developing a WordPress site. I realize that many of you have your own style of workflow so feel free to share your best workflow when dealing with “staging”, and what tools you are using.
![]()
![]()


No Comments