


You’ve already installed your favorite WordPress theme on your site, but you feel that it needs to be tweaked a bit to make it look better, which leads you to ask “How does one customize WordPress Themes?”
If you’re new to WordPress, you might think that it is hard to customize a WordPress theme because the thought about the codes scares you.
Although customizing a WordPress theme seems like rocket science, there are many simple ways to customize the look and feel of your site without breaking the theme. In fact, there are even some tools on Web that you can use to make the customization process easier and faster.
This article serves as a guide to teach you how to modify WordPress Themes the smart and easy way by using a child theme.
Why Use a Child Theme?
You might be wondering why you need to use a Child Theme instead of directly customizing the parent theme. Creating a child theme is the safest way to customize a theme. This will make sure that, if you accidentally get some issues on your site while on the process of customizing it, you can simply turn it off.
If you want to learn more about child theme, you might want to check this previous article about child themes
Customizing a WordPress Theme
On this part of this article, see how to customize a theme using a Child Theme. For the sake of this tutorial, the built-in NeoBlog WP theme (please free to download it and install it on your WordPress installation) is used as with the previous tutorial about converting HTML and CSS to WordPress. You will focus on the following customization:
- Customizing link (anchor tag) attributes
- Customizing the buttons
- Re-positioning elements
Without any further do, let’s get started.
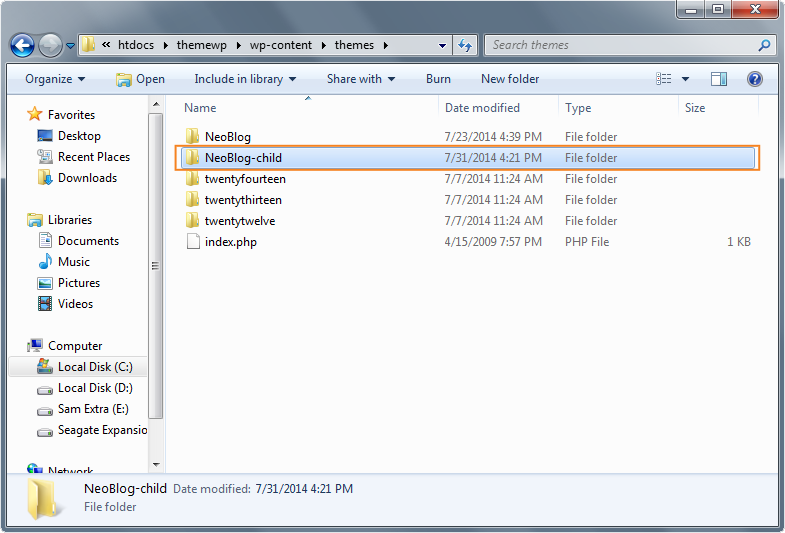
STEP 1- Creating a Child Theme Folder
To start off, you need to create our child theme folder. Inside the theme’s folder: wp-content/theme, create a new folder with the word “-child” attached on it.
Since the NeoBlog WP theme is used, the child theme folder will be “NeoBlog-child“.
STEP 2- Creating the Stylesheet
Next, create a style.css file within the “Neoblog-child” theme folder. This file will need some information place into it so that it can be identified as a child theme.
Add the following code inside the style.css file.
/*
Theme Name: NeoBlog Child Theme
Theme URI: http://www.1stwebdesigner.com/
Description: NeoBlog Child Theme
Author: Sam Norton
Author URI: http://www.1stwebdesigner.com/
Template: NeoBlog
Version: 1.0.0
*/

@import url("../NeoBlog/style.css");
/* =You can start customizing your theme here
STEP 3- Using DevTools
OK, the child theme is already created, but how would you know which part of the code to customize? Where can you check which part of the CSS was used on the theme?
Believe it or not, web browsers like Google Chrome and Mozilla Firefox has this built-in DevTools that you can use to make changes on your site without any risks.
How to use DevTool for Chrome
As mentioned previously, both Google Chrome and Mozilla have this built-in DevTools but for this tutorial, just focus on Google Chrome since it is the most widely used web browser.
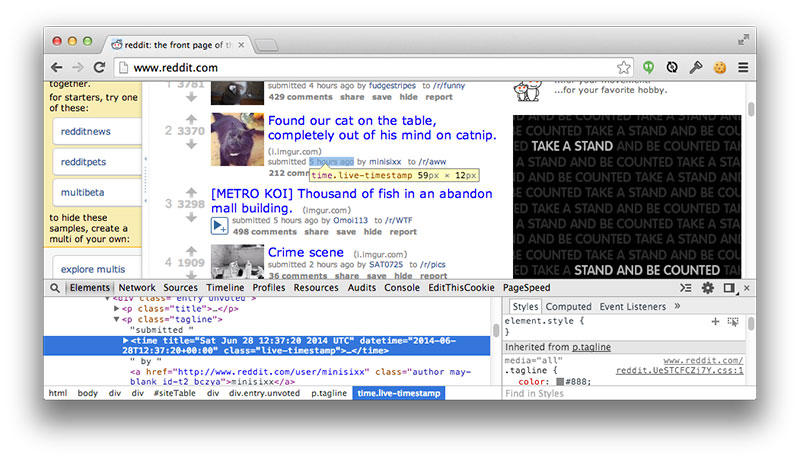
To turn it on simply Ctrl + Shift + I on Windows OS or Cmd + Opt + I on Mac OS. You can also simply right click and click on inspect elements. Now that you have turned it on, your screen should look this.
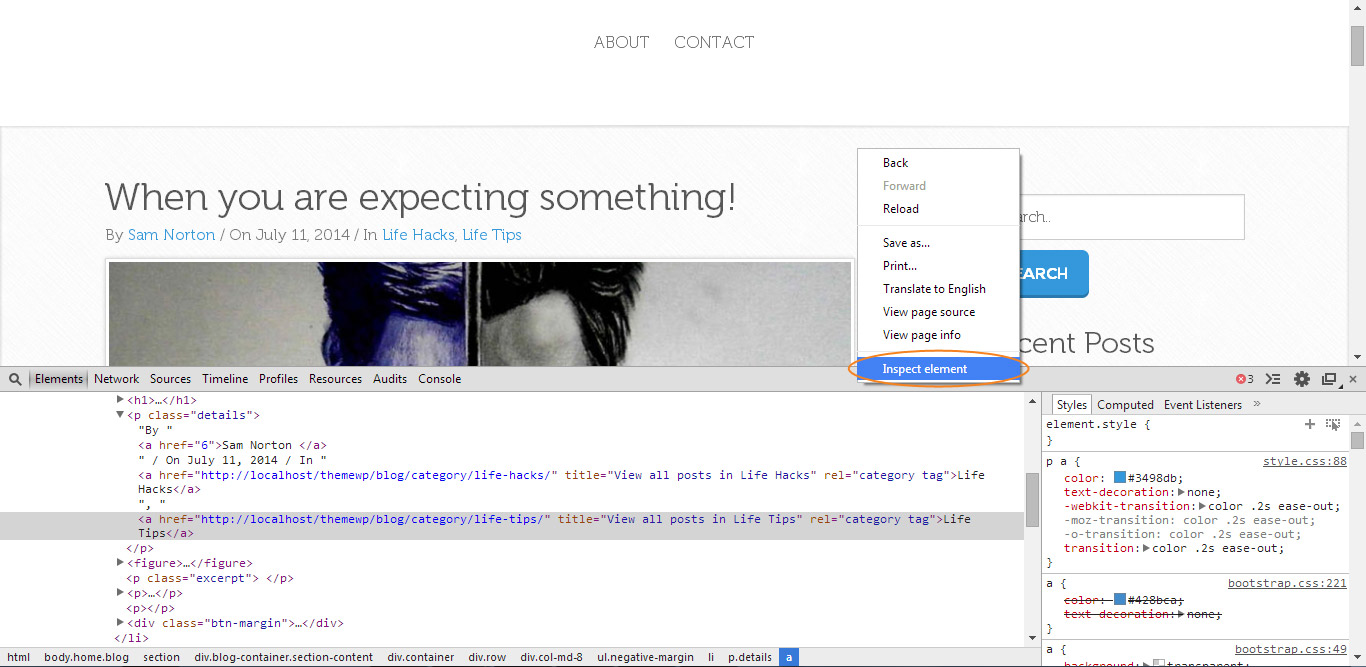
STEP 4- Customizing Link Attributes
Now with the Inspector Tool open, start hovering your mouse cursor around the NeoBlog theme front page. Notice that when you click on a particular element or tags, it shows the CSS on the right side.
For this part of the tutorial, let’s see how you can customize the color of the links to light green color (hex color: #2ecc71).
Go ahead and hover your mouse on the anchor link tags you see on the posts detail.
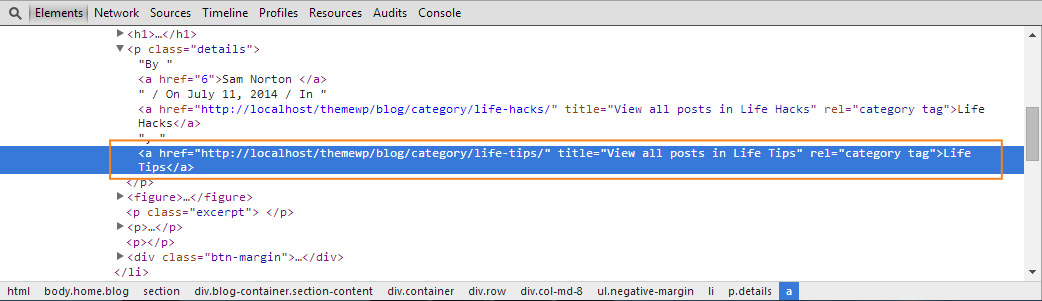
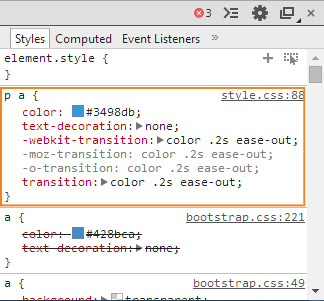
Notice that on the right side, there it has a style that looks like this:
p a {
color: #3498db;
text-decoration: none;
-webkit-transition:color .2s ease-out;
   -moz-transition:color .2s ease-out;
     -o-transition:color .2s ease-out;
        transition:color .2s ease-out;
}
You don’t need to copy all these styles on your style.css inside the NeoBlog-child folder. Since you are just changing the color, copy the color attribute along with its tag. Your CSS would look like this:
p a {
color: ##2ecc71;
}
Great! That’s how easy it is to change or modify the color. You can also change other attributes like the font-size, font face and so on. Feel free to navigate on Chrome’s Inspector Tool.
STEP 5- Customizing the Buttons
Now that you have successfully customized the links, let’s now see how you can customized the styles of the buttons.
Go ahead and navigate on the buttons tag on the Inspector tool. You will notice that the button element comes in an anchor tag with some classes. It was also wrapped in a div class btn-margin. See the code below.
<div class="btn-margin">
<a class="btn btn-primary" href=
"http://localhost/themewp/blog/2014/07/11/when-you-are-expecting-something/">
CONTINUE READING >>></a>
</div>
If you are going to hover your mouse on the anchor tag inside the div class btn-margin, you’ll see the CSS on the right side panel of the Inspector tool. You’ll see the style like this.
.btn-primary {
    font-family:'Nexa Bold';
    background-color:#3498db;
    color:#fff;
    font-size:16px;
    font-weight:700;
    height:48px;
    -webkit-box-shadow:inset 0 -3px 0 0 rgba(0,0,0,0.2);
    -moz-box-shadow:inset 0 -3px 0 0 rgba(0,0,0,0.2);
    box-shadow:inset 0 -3px 0 0 rgba(0,0,0,0.2);
    padding:12px 20px;
    text-transform:uppercase
}
Now, if you want to change the color, padding or font, you just need to copy and paste the attribute you want to change. For instance if you want to change the background color your code will look like this:
.btn-primary{
background-color: [the color];
}
STEP 6- Re-positioning Elements
If you want to re-position elements, you might need to change the floats of the elements or it might also require some WordPress template tweaking.
Let’s say, you want the excerpt to appear above the featured image. Then, you need to copy the index.php file on the parent’s theme folder to the child theme folder you created and change the position of the elements on the actual code.
This might be intimidating but not that really hard. You have this code on the original index.php file:
<?php get_header(); ?>
<!-- BLOG AREA -->
<section>
<hr class="no-margin" />
<div class="blog-container section-content">
<div class="container">
  <?php if (have_posts()) : ?>
  <div class="row">
 <div class="col-md-8">
      <ul class="negative-margin">
<li>
<?php while(have_posts()) : the_post(); ?>
 <h1><a href="<?php the_permalink(); ?>" class="gray">
 <?php the_title(); ?>
  </a></h1>
<p class="details">By <a href="<?php the_author_posts() ?>"><?php the_author(); ?> </a> / On <?php echo get_the_date('F j, Y'); ?> / In <?php the_category(', '); ?></p>
<?php if (has_post_thumbnail()) : ?>
<figure> <a href="<?php the_permalink(); ?>"><?php the_post_thumbnail('', array('class' => 'opacity-hover box-layer img-responsive')); ?></a> </figure>
<p class="excerpt"> <?php the_excerpt(); ?> </p>
   <div class="btn-margin"> <a href="<?php the_permalink(); ?>" class="btn btn-primary">CONTINUE READING >>> </a> </div>
        </li>
<?php endif; ?>
<?php endwhile; ?>

</ul>
<?php
global $wp_query;
if ($wp_query->max_num_pages > 1) : ?>
<div class="box-layer align-center page-nav">
<ul class="btn">
<li><?php previous_posts_link('<<< Previous Page', $wp_query->max_num_pages); ?></li>
<li><?php next_posts_link('Next Page >>>', $wp_query->max_num_pages); ?></li>
</ul>
</div> <!-- end box -->
<?php endif; ?>

 <?php endif; ?>
 </div>

<aside>
 <div class="col-md-3 col-md-offset-1 margin-sidebar">
<?php get_sidebar(); ?>
   </div>
</aside>
    </div>
</div>
</div>
</section>
<?php get_footer(); ?>
Then you’ll just need to transfer the_excerpt function on the top of the the_post_thumbnail function. Your code would look like this.
<?php get_header(); ?>

<!-- BLOG AREA -->
<section>
<hr class="no-margin" />
<div class="blog-container section-content">
<div class="container">
  <?php if (have_posts()) : ?>
  <div class="row">

    <div class="col-md-8">
<ul class="negative-margin">
<li>
<?php while(have_posts()) : the_post(); ?>
<h1><a href="<?php the_permalink(); ?>" class="gray">
<?php the_title(); ?>
 </a></h1>
<p class="details">By <a href="<?php the_author_posts() ?>"><?php the_author(); ?> </a> / On <?php echo get_the_date('F j, Y'); ?> / In <?php the_category(', '); ?></p>

 <p class="excerpt"> <?php the_excerpt(); ?> </p>
<?php if (has_post_thumbnail()) : ?>
<figure> <a href="<?php the_permalink(); ?>"><?php the_post_thumbnail('', array('class' => 'opacity-hover box-layer img-responsive')); ?></a> </figure>

<div class="btn-margin"> <a href="<?php the_permalink(); ?>" class="btn btn-primary">CONTINUE READING >>> </a> </div>
</li>
 <?php endif; ?>
<?php endwhile; ?>

</ul>
<?php
global $wp_query;
if ($wp_query->max_num_pages > 1) : ?>
<div class="box-layer align-center page-nav">
<ul class="btn">
<li><?php previous_posts_link('<<< Previous Page', $wp_query->max_num_pages); ?></li>
<li><?php next_posts_link('Next Page >>>', $wp_query->max_num_pages); ?></li>
</ul>
</div> <!-- end box -->
<?php endif; ?>

<?php endif; ?>
 </div>

<aside>
   <div class="col-md-3 col-md-offset-1 margin-sidebar">
   <?php get_sidebar(); ?>
   </div>
</aside>

    </div>
</div>
</div>
</section>
<?php get_footer(); ?>
Wrapping Up
There are number of ways to customize your themes and some might need a little bit of tweaking on the WordPress templates to suit your needs.
Although sometimes the changes you want to make on your theme might require some coding knowledge. If it breaks something, you can simply turn off the child theme.
Have you started customizing your theme and have any tips to share? Please feel free to share to us on the comments section.


No Comments